Tuesday, 27 March 2012

How to Use Sparklines in Excel 2010


One of the cool features of Excel 2010 is the addition of Sparklines. A Sparkline is basically a little chart displayed in a cell representing your selected data set that allows you to quickly and easily spot trends at a glance.
Inserting Sparklines on your Spreadsheet
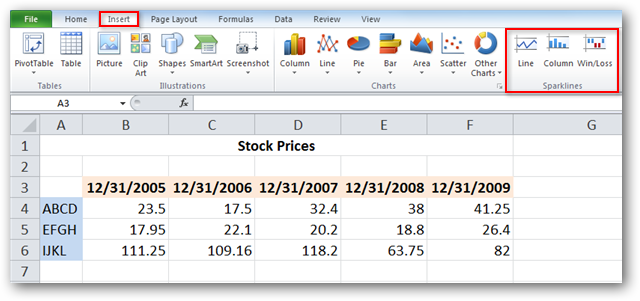
You will find the Sparklines group located on the Insert tab.
 sshot-1
Select the cell or cells where you wish to display your Sparklines.
sshot-2
Select the type of Sparkline you’d like to add to your spreadsheet. You’ll notice there are three types of Sparklines, Line, Column, and Win/Loss. We’ll select Line for our example.
sshot-3
Create Sparklines pops up and will prompt you to enter a Data Range you are using to create the Sparklines. You’ll notice that the location range (the range where the Sparklines will appear) is already filled in.
You can type in the data range manually, or click and drag with your mouse across to select the data range. This will auto-fill the data range for you. Click OK when you are finished.
 sshot-6
You will see your Sparklines appear in the desired cells.
 sshot-8
Customizing Sparklines
Select the one of more of the Sparklines to reveal the Design tab. You can display certain value points like high and low points, negative points, and first and last points by selecting the corresponding options from the Show group. You can also mark all value points by selecting  Markers.
sshot-11
Select your desired Sparklines and click one of the included styles from the Style group on the Design tab.
sshot-12
Click the down arrow on the lower right corner of the box to display additional pre-defined styles…
sshot-13 
or select Sparkline Color or Marker Color options to fully customize your Sparklines.
sshot-14
The Axis options allow additional options such as Date Axis Type, Plotting Data Left to Right, and displaying an axis point to represent the zero line in your data with Show Axis.
sshot-19
Column Sparklines
Column Sparklines display your data in individual columns as opposed to the Line view we’ve been using for our examples.
sshot-18
Win/Loss Sparklines
Win/Loss shows a basic positive or negative representation of your data set.
 sshot-20
You can easily switch between different Sparkline types by simply selecting the current cells (individually or the entire group), and then clicking the desired type on the Design tab.
sshot-21
For those that may be more visually oriented, Sparklines can be a wonderful addition to any spreadsheet.

Import OneNote 2010 Notebooks Into Evernote


Would you like to move your notes from OneNote 2010 into Evernote?  There’s no official way to import OneNote 2010 notes into Evernote, but here’s a solution that can help you get most of your notes transferred.
If you’ve been using OneNote 2010 and tried to import your notebooks into Evernote, you may have been disappointed and frustrated to be informed that Evernote only imports from OneNote 2007.  Even if you’ve converted your notebooks into OneNote 2007 format, you cannot import OneNote notes into Evernote 3.5 without having OneNote 2007 installed.  The Evernote team has mentioned on their support forum that they’re working on adding OneNote 2010 import, but for now, here’s a workaround to get OneNote 2010 notes into Evernote.
image
There are 2 great ways to import your OneNote 2010 data into Evernote.  First, you can just directly copy the content of your notebook sections, and then paste it directly into Evernote.  You’ll maintain most of your OneNote content and formatting this way, and can still edit and add to the notes.  Or, you can export whole notebooks as PDF, and then add the PDF files to Evernote.  This works good too, but you won’t be able to edit the notes in Evernote.  Let’s look at both options.
Copy OneNote 2010 Sections Into Evernote
Thankfully, copy and paste from OneNote into Evernote works great.  You can select everything on your note by pressing Ctrl+A, and then copy it and paste it into Evernote.  Here’s our notebook in OneNote:
Create a new note in Evernote, and paste the content from OneNote in it.
Here it is after we pasted it into Evernote.  It looks almost the same, but it didn’t copy the title correctly so you may want to copy that separately.  While you’re importing it into Evernote anyhow, you should add tags too so you can easily find your content.
Copying and pasting your data from each note could take forever if you have lots of notes, so instead you could copy a whole section at a time.  To do this, select all of your pages on the right side, right-click, and select Copy.  You can select all of the pages by selecting the first page, then holding the shift key down and selecting the last one.
Now, once again, paste it into a new note in Evernote.  This time, your note will be rather long, as it will contain all of the content from all the pages in that section.  It may take a minute for Evernote to display all of the data, but it should paste in with almost the same formatting as your OneNote Notebook had.  This is a much quicker way to get your OneNote data into Evernote, but still it may take a while if you have many Notebook sections.
Convert OneNote 2010 Notebooks to PDF
If you have lots of notebook sections in OneNote, it may be too difficult or time consuming to copy and paste them all into Evernote.  If so, the quickest way to import the notes into Evernote would be to export your notebooks as PDF.  This would let you get all the sections and pages from that notebook into Evernote directly, but you won’t be able to edit or add to the notes in Evernote.  Additionally, if you’re not a premium subscriber, you may not be able to search inside the PDFs as well.
To convert a notebook to PDF, right-click on the notebook in the left side of OneNote and select Save As.
Select PDF in the available file types, and make sure to select Current Notebook in the page range.
The conversion may take a few moments, depending on how many sections and pages you had in the notebook.
Once it’s finished, right-click the PDF in Explorer and select Send to Evernote.  Alternately you can copy and paste the PDF file into a new or existing Evernote note.
Do note that PDF files can be large.  One of our notebooks had over 150 pages with several images in most pages, and the final PDF was around 5Mb.  Free Evernote accounts can only upload 40Mb of data per month, so make sure you have enough upload space to add your notes all at once.
Once your PDF is in Evernote, you can browse thorough the pages directly in Evernote or double-click on the document to open it in your default PDF reader.  Note that each individual page from OneNote will be at least one page in your PDF, depending on how long your notes were.
If you want to save in other formats, check out our beginners article on how to save OneNote 2010 Notes to Different File Formats.
Conclusion
Although Evernote doesn’t currently support importing notes from OneNote 2010, it’s still not too difficult to get your notes imported.  Even if you prefer OneNote, this could be a way you could take your notes on your mobile device, as Evernote supports far more devices than OneNote.  We’ll be watching out for an Evernote update that adds support for OneNote 2010, and if one comes, we’ll be sure to let you know!
Links
Download Evernote for Windows

Using the New Windows Explorer Ribbon in Windows 8


00_windows_8_explorer
The Ribbon interface became a feature in the Microsoft Office suite as of version 2007. The Windows 8 Developer Preview introduced the Ribbon interface into Windows Explorer and it’s been improved in the Windows 8 Consumer Preview.
By default, the Explorer ribbon is now hidden. Use the down arrow button next to the help button in the upper, right corner of the Explorer window to expand the ribbon.
There are three core tabs (Home, Share, and View) and the File menu. The Home tab contains common commands, such as Copy, Paste, New folder, Delete, and Rename.
The Share tab makes it easy to zip, email, print, and fax files, and share folders.
Contextual tabs displays as you select specific files and folders. For example, if you select an image file, such as a .png file or a .jpg file, the Picture Tools context tab displays providing options only applicable to those types of files. Contextual tabs are color coded so they stand out.
Some of the core tabs may change when you select certain items. When you select Computer in the Navigation pane, the Home tab becomes the Computer tab and the Share tab is not available. The Computer tab provides easy access to the Control Panel and allows you to uninstall or change programs.
The Disk Tools contextual tab also becomes available, providing tools for working with hard drives and removable storage, such as Bitlocker, Optimize, Cleanup, and Format.
Windows 8 also has a built-in tool to mount disc images, such as .iso files and .vhd files, and a tool to burn an image to a disc. Selecting the appropriate type of file activates the Disc Image Tools contextual tab.
Just as there is in Microsoft Office 2007 and 2010 programs, there are popup descriptions that display when you move your mouse over an option on the ribbon. If there is a keyboard shortcut for that option, if displays on the popup.
If you are more comfortable using the keyboard, the ribbon can be navigated using the keyboard. Press Alt to show keyboard shortcuts for accessing the tabs and the Quick Access Toolbar buttons. Then, press a key for a tab, such as “H” for the Home tab.
Once you’ve pressed the key for a tab, hotkey hints display for the options on that tab. Press the hotkey for the desired option.
The File menu allows you to open a new Explorer window and access the most recently accessed folders and drives in the jump list, called Frequent places, on the right. The jump list was called Favorite Places in the Developer Preview.
The File menu in Windows Explorer now provides easy access to both the command prompt and the Windows PowerShell. You can open both as a normal user or as an administrator. A window opens to the folder currently open in Explorer.
The Open command window here option is still available by pressing Shift while right-clicking on a folder in Explorer. This also opens a command prompt window to the folder currently open in the Explorer window.
The View menu allows you to customize the panes, show and hide File name extensions and hidden items, and also easily Change folder and search options using the Options button.
Selecting the Change folder and search options item from the Options drop-down menu opens the classic Folder Options dialog box, containing the standard options from previous versions of Windows.
You can easily change the layout of the files and folders. The Layout section of the View tab allows you to choose to view the list of files and folders as different sized icons, as a list, as tiles, or in a detailed list.
The lower, right corner of the Explorer window provides two buttons that allow you to quickly switch between the Large icons view and the Details view.
The Panes section of the View tab allows you to easily customize the Navigation pane and to show or hide the Preview and the Details pane.
The same Quick Access Toolbar from Microsoft Office has been added to Windows Explorer. You can add any of the options from the ribbon to the Quick Access Toolbar simply by right-clicking on the option and selecting Add to Quick Access Toolbar. By default, the Quick Access Toolbar displays above the ribbon. However, you can choose to move it below the ribbon using the same right-click menu.
By default, the Properties and New Folder buttons are available on the Quick Access Toolbar. We added a few buttons to the Quick Access Toolbar, as shown in the following image.
A lot of people mourned the loss of the “Up” button in Windows 7 Explorer. It’s been brought back in Windows 8 and is available directly to the left of the address bar.
The ribbon interface may take some time to get used to, but it exposes close to 200 file management commands some of which used to be buried in menus, dialog boxes, or right-click menus. Windows 8 Explorer makes file management easier and more convenient.

Create a System Restore Point in Windows 7


When System Restore was introduced in back in Windows Me it has helped save some major computer snafus on several occasions.  The feature is still included in the new Windows 7 operating system and today we will take a look at how to create a new restore point.
Create a Restore Point
It is recommended that you create a restore point before installing new software or making any major changes to your computer.  Often times when you install new software you’re given the choice to create a point but if not you can do one manually as well.
Right-click on My Computer and go to Properties.
1
Next click on the System Protection link.
The System Properties dialog screen opens up and you will want to click on Create.
 
Type in a description for the restore point which will help you remember the point at which is was created.
 
The time it takes to create the restore point will depend on the amount of data, computer speed etc.
All done!  Now if something goes wrong you have the satisfaction knowing that you can go back in time to the point before the changes were made.